Food Grade Certification, Flexible, Low Viscosity Molding Applications,low-temperature Ninja Silicone , https://www.ninjasilicone.com
Today, various types of transmitters are employed to measure different parameters like temperature, pressure, flow, level, and more. An instrument designed specifically to measure the pressure of a fluid is known as a pressure gauge. These gauges are widely utilized across numerous industries. However, for accurate readings of fluid pressure, these instruments must undergo proper calibration. There are multiple tools and methods available for calibrating these devices, but the most commonly used method involves the use of a dead weight tester. What exactly is this tester, and how does it assist in calibrating pressure gauges? Are you curious to learn more? Please continue reading, as this post will explain the calibration process step by step.
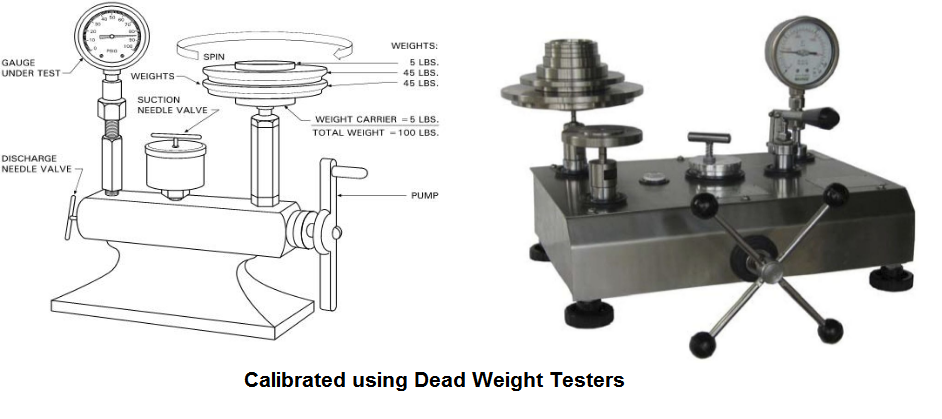
### Understanding the Dead Weight Tester
To comprehend the calibration process, it's essential first to grasp what a dead weight tester is. Simply put, it’s an apparatus that employs precisely calibrated weights to verify the accuracy of pressure gauge readings. The core components of these testers include a fluid medium, a connection port, and a weight along with a piston. The reference pressure for these testers is determined using the formula:
\[ p = \frac{F}{A} \]
Where:
- \( p \): Reference Pressure (in Pascals)
- \( F \): Force applied to the Piston (in Newtons)
- \( A \): Area of the Piston Cylinder (in square meters)
### Calibration Process Using a Dead Weight Tester
Calibrating a pressure gauge using a dead weight tester assembly involves several steps to ensure precise results. Here’s how the process unfolds:
#### Step 1: Preparing the Setup
The initial step is to set up the equipment correctly. Ensure that the device is placed on a flat, stable surface to avoid any errors during operation. Once this is confirmed, attach the pressure gauge to the test port.
#### Step 2: Adjusting for Zero Error
It’s crucial to eliminate any zero error before starting the calibration. Verify that the pressure gauge reads zero. If it doesn’t, adjust the gauge accordingly to ensure it’s set to zero. Failing to do so could result in calibration inaccuracies.
#### Step 3: Placing the Weights
This marks the beginning of the actual calibration. Choose a reference weight and place it onto the vertical piston of the dead weight tester assembly.
#### Step 4: Rotating the Pistons
In addition to the vertical piston, there is also a horizontal piston connected by a handle. Rotate this handle until the piston and weight are freely supported by the oil. Next, turn the vertical piston so it floats freely.
#### Step 5: Recording the Data
Allow the system to stabilize for a few moments. Once stable, note down the readings from both the gauge and the weight.
#### Step 6: Completing the Calibration
This is the final phase. Repeat steps 3 through 5, gradually increasing the pressure by adding more weights until maximum pressure is achieved. Then, reduce the weights one by one until the gauge pressure returns to zero. Finally, check if the gauge pressure reading contains any errors. If the error falls within acceptable limits, consider the gauge successfully calibrated.
Dead weight testers can calibrate a wide range of pressure-measuring devices, including industrial pressure gauges and transmitters. For further insights into pressure gauges and their calibration, feel free to reach out to industry experts. The Transmitter Shop is an experienced provider that can assist with highly accurate calibrations.
---
### Related Posts
- What Are the Steps Involved in Calibrating Pressure Gauges?
- All Important Questions on Reconditioned Transmitters Answered
- Is Remanufactured Transmitter a Better Option Than a New One?
- Differential Pressure Transmitters: How Do They Aid in Flow Measurements?
- 3 Things That Explain How Often You Should Calibrate Pressure Transducers
- Guidelines for Troubleshooting Pressure Transducers
- Learn How to Calibrate a Pressure Transmitter – Part II
- Learn How to Calibrate a Pressure Transmitter
- Know Three Interesting Uses of Pressure Transmitters
- The Features and Benefits of Rosemount 1199 Direct Mount Transmitters
- 3 Major Pressure Transmitter Technologies That Made the Device Popular
- An Unconventional Guide to Selecting the Right Pressure Sensor
- Factors to Be Considered While Differentiating $40 and $400 Pressure Transmitters
- Tips to Augment the Performance and Service Life of Pressure Transmitters
- Factors of Consideration When Choosing Pressure Transmitters
- 5 Most Popular Pressure Transmitter Technologies
- Important Calibration Tips for Pressure Sensors
- Tips to Improve the Performance of Pressure Sensors
- Factors to Consider When Choosing a Pressure Transmitter Manifold
- Safety Tips for Differential Pressure Transmitter Operation
- Impact of Shock and Vibration on Pressure Transducers
- Rosemount 3051S vs 3051C Transmitter – What’s Your Choice?
- Rosemount 2088 vs Rosemount 3051 – A Few Points of Differences Discussed
- What Are Diaphragm Seals and Their Types?
- Difference Between Conventional Transmitters and Smart Transmitters
- How to Choose Diaphragm Seals for Your Application?
- How to Select Pressure Transmitter for Your Application?
- Remote Seals: Significance, Working Principle & Applications
- How Do You Calibrate a Flow Transmitter?
- What Is an Absolute Pressure Transmitter & How Does It Work?
- HART Communication Protocol: Overview, Working Principle, Benefits in Industrial Automation
- Absolute and Gauge Pressure Transmitters - Overview and Working Principle
- Flow Meter vs Flow Transmitter: Know the Difference
- Temperature Transmitter: How to Select the Efficient One for Your Application?
- How Do You Test for 4 to 20mA Signal in a Pressure Transmitter?
- Multivariable Transmitter: What Is It and How Does It Work?
- Pressure Transmitters vs. Pressure Transducers: Learn the Differential Characteristics
- Procedure to Calculate Accuracy of Pressure Transmitter Discussed
- An Ultimate Selection Guide for Flow Transmitters
- The Benefits and Challenges of HVAC System Balancing
- Understanding Pressure Ranges and Units for Fluid System Monitoring
- Understanding the Impact of Pressure Fluctuations on Drying Performance
- Monitoring and Controlling Energy Production in Power Plants
- Common Challenges in Air Flow Measurement and How to Overcome Them
- Pressure Monitoring in Pump Systems: A Comprehensive Guide
- Exploring Density and Viscosity Measurement in Industrial Processes
---
By following these detailed steps, you can effectively calibrate pressure gauges using a dead weight tester, ensuring accurate measurements and reliable performance across various applications.
Low temperature liquid silicone rubber
Low-temperature molding liquid silicone rubber exhibits excellent chemical resistance and aging properties, effectively resisting the corrosion of various chemicals and extending the product's service life. Additionally, the material is highly versatile in processing, allowing for the production of complex shapes through injection molding or compression molding, and it can be customized in different colors and hardness levels according to customer requirements